3. Manipulating Text
3.1 Positioning And Formatting Text
Now let's chuck some text into the body of the page, under the heading. Formatting the text is mainly carried out
using the common tags:
- <BLOCKQUOTE>...</BLOCKQUOTE> - indents a block of text.
- <B>...</B> - turns the text into bold characters.
- <I>...</I> - turns the text into italics.
- <U>...</U> - underlines the text.
- <STRIKE>...</STRIKE> - causes a line to be struck through the text enclosed within the tag pair.
- <S>...</S> - performs the same as the STRIKE tag pair.
- <BR> - starts a new line.
- <P>...</P> - starts a new paragraph.
- <CODE>...</CODE> - causes the text to look like program code, monospaced text.
- <PRE>...</PRE> - keeps the contained text in the format written within the HTML file. Also uses a monospaced font.
We will now create some text using the above formatting commands plus vary the headings.
Examine the following code and the next graphic to see the effect of the tags:
<H5>Here are a few headings starting with this H5
heading</H5>

<H4>An H4 heading</H4>

<H1>Now an H1 heading</H1>

<BLOCKQUOTE>
I think that you <B>should</H5> be getting the
idea as far as headings go.  Notice
that you can put as many spaces and lines in the HTML code
without the browser picking
them up
</BLOCKQUOTE>

<i>The browser</I> only looks at the tags.
Here is some <B><I>bold, italic
text</I></B> and a little bit of text which
is <U>underlined</U>, plus
some strike through text that indicates that the
<STRIKE>�Old Price</STRIKE> is now
out of date.

<P>
Finally, let's finish with some code such as:
</P>

<P>
<code>
if (hWindow == NULL)
<BR>
   return hWindow;
<P>
   ShowWindow(hWindow, nCmdShow);
<BR>
   UpdateWindow(hWindow);
<P>
   return hWindow;
</CODE>
</P>
</P>
</P>

<PRE>
And			a bit
of pre - formatted
					stuff
</PRE>

Notice the effect of the <BLOCKQUOTE>, very neat! It indents the text on both the left
and right hand margins. Also, you may have seen me
use lower case letters for one or two of the tags, this is fine, the parser is not
bothered which case is used. You will find that most HTML tags use uppercase for
clarity. You will also observe that headings, blockquotes and text formatting create new lines
automatically, thereby negating the need for paragraphs in most cases.
Rather than let the browser decide when a new line of textends (i.e. the end of the display screen)
you can use the <BR> tag to determine where the line breaks yourself. You can use an attribute
with <BR> called CLEAR that informs the browser to insert a line break clear of any
tables or images. The values are LEFT, RIGHT, ALL or NONE.
Related to this is the <NOBR> and </NOBR> tag pair that prevents a line of text
from being 'broken' over two or more lines. An example of its use is if you are displaying a long URL that
you do not want to have split on the screen.
You may come across the <ADDRESS> and </ADDRESS> tag pair. This does the same as
the Italics tag pair <I> and </I>. Other tag pairs that do exactly the same are:
- <CITE> and </CITE>
- <EM> and </EM>
- <KBD> and </KBD>
- <VAR> and </VAR>
Also, the <STRONG> and </STRONG> tag pair does the same
as the <B> and </B> tag pair.
Instead of using <PRE> you could use the <XMP> and </XMP> tag pair.
This then allows you to insert HTML tag characters without going through the routine of using
the escape sequences. <XMP> enables the browser to ignore the HTML stuff. You can also
define the font using the <FONT> and </FONT> tag pair within either <XMP>
or <PRE>.
The tag pairs <TT> and </TT>, <SAMP> and </SAMP> perform the same
function as the tag pairs <CODE> and </CODE> and <PRE> and </PRE>.
The differences with <PRE> and </PRE> are that lines and tabs are maintained plus an extra
line is added afterwards.
Just for reference, there are some common character entities used for certain characters
within HTML:
- < for <
- > for >
- & for &
- " for "
If you examined the HTML text for this page, you will notice that I have used some of these
character entities in order to be able to show the < and > characters which are so prevalent
in HTML. Also, be careful to include the semi-colon, I have noticed that sometimes
the < may turn out as &lt instead (Netscape 3.0 does this) as the browser makes
a best guess. Funnily enough using &#60 let's you get away with it, similarly
having a / afterwards also let's you get away with it. The same problem does not
seem to occur with the >.
A complete list of character entities can be found at the W3 website by following the
link
https://www.w3.org/TR/REC-html40/sgml/entities.html
You can adjust the use of the <P> tag. for instance putting text inside <P ALIGN=CENTER> and
</P> will center the text across the page.
For instance, using the ALIGN command with the
<P> tag like this:
<P ALIGN=LEFT>
Aligning a paragraph left like this just aligns the left hand side
of the text and not the right.  It also pushes the text to the
left and helps to emphasise this paragraph, or paragraphs enclosed
within the tags.
</P>

<P ALIGN=CENTER>
Especially when used in conjunction with the ALIGN=CENTER attribute
which puts all the text in the middle of the page.
</P>

<P ALIGN=RIGHT>
And finally, aligning the text to the right.
</P>
Gives this effect:
One thing worth pointing out at this point is that although you can get away with not closing tags e.g.
the <P> can be used without the corresponding </P> tag, however HTNL 4.01
requires all tags to be closed.
The Division tag pair <DIV> and </DIV> are used in the same way as the
<P> and </P> tag pair with the same ALIGN attribute values of
LEFT, RIGHT and CENTER. The Division tag pair do not insert a space between one division
and the other, unlike the Paragraph tag pair.
3.2 Modifying The Font
Furthermore, we can change our text such as add a splash of colour by way of the <FONT> tag.
Using the command COLOR (note the American spelling!). We define the
colour using a hexadecimal number in the form #7c34ff. The hash just
tells the parser that a number is coming up and the following six numbers
are grouped into three pairs. The first pair denote the Red component of the
colour from 00 to FF, the second pair denote the green component and the final
pair denote the Blue component. The following example illustrates the effect
of using COLOR.
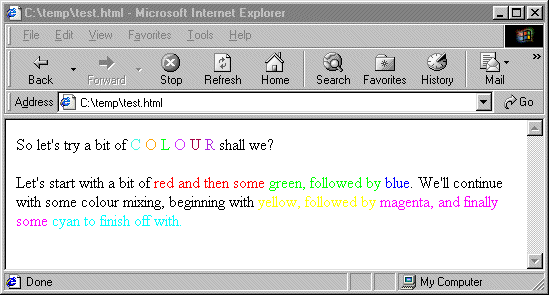
<P>
So let's try a bit of
<FONT COLOR="#45F3E0">C</FONT>
<FONT COLOR="#FFA30C">O</FONT>
<FONT COLOR="#00FF10">L</FONT>
<FONT COLOR="#CC34FF">O</FONT>
<FONT COLOR="#A40045">U</FONT>
<FONT COLOR="#AA22DD">R</FONT>
shall we?
</P>

<P>
Let's start with a bit of
<FONT COLOR="#FF0000">red and then some</FONT>
<FONT COLOR="#00FF00">green, followed by</FONT>
<FONT COLOR="#0000FF">blue</FONT>.  We'll continue
with some colour mixing, beginning with
<FONT COLOR="#FFFF00">yellow, followed by</FONT>
<FONT COLOR="#FF00FF">magenta, and finally some</FONT>
<FONT COLOR="#00FFFF">cyan to finish off with.</FONT>
</P>
Results in:
You can use any colour between the extremes that have been illustrated here and you can name
some of them instead of using a hexadecimal value. Although colour names are supported at the moment,
they are not part of the W3 standard. When writing CSS files it is wise to use the hexadecimal values.
There are a couple more tricks on manipulating fonts, one is to vary the
size of the font, using the SIZE command and the other is to change the type
of font itself, using the FACE command. These two methods are illustrated next:
<FONT SIZE="+1">This font size is 1, whilst</FONT>
<FONT SIZE="+2">This font size is 2, in fact, we can go up to</FONT>
<FONT SIZE="+7">font size 7</FONT>

<P>
<FONT FACE="Arial">We can use the Arial font if we wish to, or</FONT>
<FONT FACE="Times New Roman">maybe Times New Roman, or</FONT>
<FONT FACE="Courier">even the Courier font.</FONT>
</P>

<P>
In fact, any font that exists on the computer.
</P>
Gives:
You can decrease the font size using '-1', '-2' etc. for values instead. 1pt is 1/72 of an inch which is about
0.35mm. A font size of 1 is roughly equivalent to 8pt text and a font size of 7 is about 36pt.
More granular font sizes can be defined using Cascading Style Sheets.
The default font size is +3. An alternative to changing font sizes comes in the form of the <BIG>
and </BIG> tag pair, or multiples of them nested within each other. Similarly, the <SMALL>
and </SMALL> tag pair decreases the font size relative to the current size.
You could not use the </FONT> tag until the end.
This is because the next FONT command overrides the previous one, and what is more, this is
the case with the other HTML tag commands, however HTML 4.01 requires all tags to be closed.
An alternative to changing font sizes comes in the form of
the <BIG> and </BIG> tag pair or multiples of them, which increase the font size.
Similarly, the <SMALL> and </SMALL> tag pair decreases the font size relative
to the current size.
If you are frequently requiring superscripts and subscripts then use the <SUP> and </SUP> tag pair
to give you your superscript, and the <SUB> and </SUB> tag pair for your subscript.
Ideal for mathematical text, dates etc.
3.3 Lists
Before we move on to some fun stuff we need to look at the three ways in which
HTML handles lists:
- Ordered Lists - using the tags <OL>, </OL> (for the type of list) and
<LI> (for the list item).
- Unnumbered Lists - using the tags <UL>, </UL> (for the type of list) and
<LI> (for the list item).
- Definition Lists - using the tags <DL>, </DL> (for the type of list),
<DT> (for the term) and <DD> (for the definition).
Examine the following to see examples of all three list types:
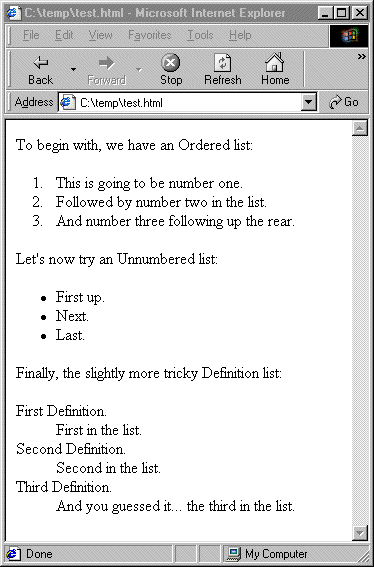
To begin with, we have an Ordered list:

<OL>
<LI>This is going to be number one.
<LI>Followed by number two in the list.
<LI>And number three following up the rear.
</OL>

Let's now try an Unnumbered list:

<UL>
<LI>First up.
<LI>Next.
<LI>Last.
</UL>

Finally, the slightly more tricky Definition list:

<DL>
<DT>First Definition.
<DD>First in the list.
<DT>Second Definition.
<DD>Second in the list.
<DT>Third Definition.
<DD>And you guessed it... the third in the list.
</DL>
Notice that the list automatically creates blank lines below them.
In the unnumbered list, if you wish to be really snazzy, you can change the type of bullet from the default 'disc' to a 'circle'
or 'square' by way of the attribute TYPE=circle within the <UL> tag. Similarly for
the ordered list, you can change the type of numbering by typing TYPE="A" for marking items with
letters or TYPE="i" for Roman Numerals. Again the TYPE attribute would be within the <OL> tag.
You can use the attribute START or VALUE to decide where the numbering begins e.g. TYPE="i" START="iii"
means that Roman Numerals will be used for this particular list, starting at iii. Different list styles
can be nested within one another.
The <DIR> and </DIR> tag pair does the same job as the <UL> and </UL>
list tag pair, other than only a 20 character width is allowed in the column. The <MENU> and </MENU>
list tag pair also performs the same function and was the original method of creating a single-column list.

|